Making the Seating Plan Work

I first designed the interactive seating plan in my NQT year, 2012. I have since developed this through three different versions to the current version 3. Over ten thousand teachers have downloaded a version and use the interactive seating plan both within the UK and internationally. It has gone from having to manually type all the information into just having to copy and paste data from your student information sheet.
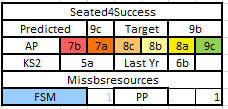
NEW Seating Plan GCSE 1-9
Click here to find out more information.
Input grades as 1c, 1b, 1a, 2c, 2b,... ... ..., 8b, 8a, 9c, 9b, 9a.
Why use it?
You can easily identify your target groups of students such as PP, FSM, SEND and G&T. You are able to clearly track and monitor progress of all students' and put intervention strategies in place accordingly. It looks professional and is an easy to use visual aid. Ultimately once your template is set up it is quicker than using a handwritten seating plan and just needs a number changing to swap a student's seat.
So how do you make the interactive seating plan work for you?
To start off click the link to download the spreadsheets for free.
You can also download this version and others from TES.
How do you to set one up?
The classroom layout
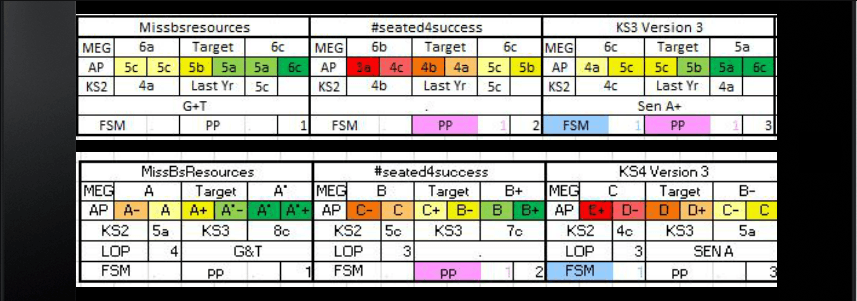
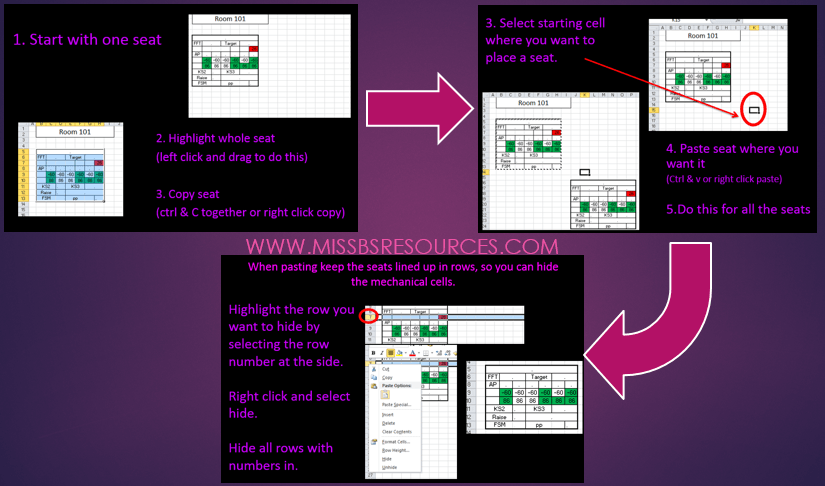
You can do any layout you want as long as you follow the rule that the rows line up; this is important because there are the ‘working cells’ that need to be hidden. These cells do the calculations that help colour co-ordinate the progress of each student. See the image for some examples of table set-ups. You can make any shape you want. Note that the columns don’t need to line up.
To set up this you just copy and paste the single seat in the downloadable version. See below of how to do this.

You only need to set up your template once in both versions. Once this is done save it as a master copy. After hiding the cells your classroom seats should look like this.
Student Data
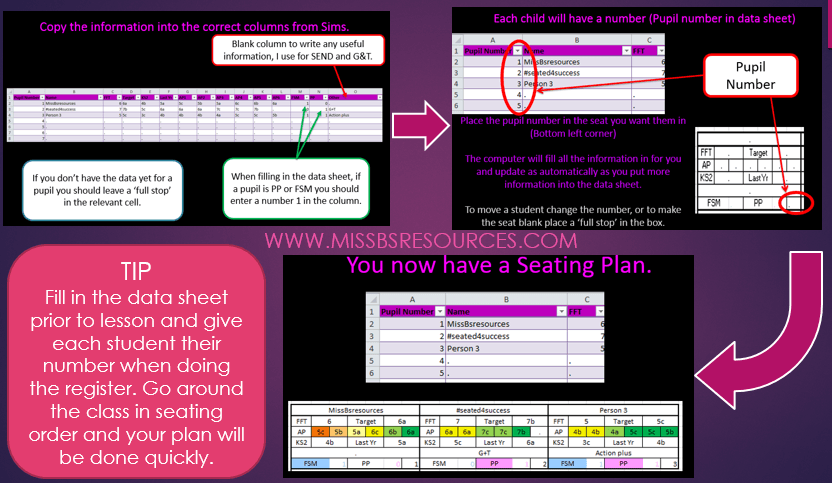
You’ve done the hard work, now it’s a quick game of copy and paste data.
Once you have a template created open it up and resave as the classes seating plan you are creating. (Don’t override your master blank template copy). Also load up you student data spreadsheet, this is the downloadable class information sheet from Sims, Serco or any other register system.
Copy and paste the whole columns without the heading from the excel spreadsheet into the data sheet using (Ctrl C for copy and Ctrl V for paste). Remember put a ‘full stop’ anywhere you don’t have data for).

Key
LoPs – Current Levels of Progress a student is on.
MEG – Minimum Expected Grade
AP – Assessment Point
Aspire/Target – Grade you want them to get, for GCSE I normally make this 4 Levels of Progress and KS3 3 Sub Levels of Progress.
PP – Pupil Premium
FSM – Free School Meal
The KS3 grades run as N, B, 1c, 1b, 1a, 2c……… 8a
The KS4 grades run as N, B, U, G-, G, G+, F-, ………., A, A+, A*-, A*, A*+
If you need a different grade set up please do get in touch and I will edit for you.
So now you have yourself a swanky new interactive seating plan, which does all the hard work for you. Throughout the year as you get more assessment points just copy and paste these from you data sheet into the spread sheet and it will automatically update the seats for you.
I hope you find this useful. All feedback is welcome.
Tags: Behaviour Management, Seated4Success, Seating Plan
Comments
- No comments found


Leave your comments
Login to post a comment
Post comment as a guest